


前提
安装wiringPi
阅读《OrangePi_Zero_H2+_用户手册_v3.2.pdf》“3.20. 26 Pin 接口引脚说明”章节,按照说明进行安装。 当前情况下安装后发现执行会报错:
root@orangepi:~# apt update
root@orangepi:~# apt install git
root@orangepi:~# git clone https://github.com/orangepi-xunlong/wiringOP
root@orangepi:~# cd wiringOP
root@orangepi:~/wiringOP# ./build clean
root@orangepi:~/wiringOP# ./build
# 报错
root@orangepi:~# gpio readall
root@orangepi:~# wiringPiSetup: mmap (PWM) failed: Invalid argument
原因:orangepi官方代码问题,参见:
https://github.com/orangepi-xunlong/wiringOP/issues/96 git checkout -b a846ffd8f5583516cd25c6b08e49fd9cc47728c4 我测试这个编译也不行。然后再切回master才行不知为何。
#按照issue说明切到改提交点
root@orangepizero:/mnt# git checkout -b a846ffd8f5583516cd25c6b08e49fd9cc47728c4
./build clean
./build

#不知为何以上自己build后还不能用,再切回来build才行。 如果不行多切几次..
root@orangepizero:/mnt# git checkout master
./build clean
./build
gpio引脚图
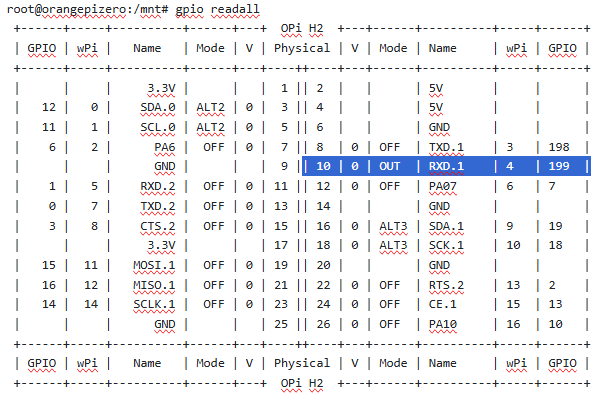
root@orangepizero:/mnt# gpio readall
 +------+-----+----------+------+---+  OPi H2  +---+------+----------+-----+------+
 | GPIO | wPi |   Name   | Mode | V | Physical | V | Mode | Name     | wPi | GPIO |
 +------+-----+----------+------+---+----++----+---+------+----------+-----+------+
 |      |     |     3.3V |      |   |  1 || 2  |   |      | 5V       |     |      |
 |   12 |   0 |    SDA.0 | ALT2 | 0 |  3 || 4  |   |      | 5V       |     |      |
 |   11 |   1 |    SCL.0 | ALT2 | 0 |  5 || 6  |   |      | GND      |     |      |
 |    6 |   2 |      PA6 |  OFF | 0 |  7 || 8  | 0 | OFF  | TXD.1    | 3   | 198  |
 |      |     |      GND |      |   |  9 || 10 | 0 | OUT  | RXD.1    | 4   | 199  |
 |    1 |   5 |    RXD.2 |  OFF | 0 | 11 || 12 | 0 | OFF  | PA07     | 6   | 7    |
 |    0 |   7 |    TXD.2 |  OFF | 0 | 13 || 14 |   |      | GND      |     |      |
 |    3 |   8 |    CTS.2 |  OFF | 0 | 15 || 16 | 0 | ALT3 | SDA.1    | 9   | 19   |
 |      |     |     3.3V |      |   | 17 || 18 | 0 | ALT3 | SCK.1    | 10  | 18   |
 |   15 |  11 |   MOSI.1 |  OFF | 0 | 19 || 20 |   |      | GND      |     |      |
 |   16 |  12 |   MISO.1 |  OFF | 0 | 21 || 22 | 0 | OFF  | RTS.2    | 13  | 2    |
 |   14 |  14 |   SCLK.1 |  OFF | 0 | 23 || 24 | 0 | OFF  | CE.1     | 15  | 13   |
 |      |     |      GND |      |   | 25 || 26 | 0 | OFF  | PA10     | 16  | 10   |
 +------+-----+----------+------+---+----++----+---+------+----------+-----+------+
 | GPIO | wPi |   Name   | Mode | V | Physical | V | Mode | Name     | wPi | GPIO |
 +------+-----+----------+------+---+  OPi H2  +---+------+----------+-----+------+
风扇
OrangePi Zero只贴了一个散热片,在20多度的室温下运行PiKVM情况下CPU温度有50°C左右,有点高所以需要添加一个风扇。刚好它有很多GPIO口。因此做一个可启停的风扇当温度高于50°C时启动风扇。
虽然OrangePi Zero支持PWM调速但是风扇比较羸弱转速也不快也就不需要调速了,直接全速降温。
准备
风扇小于5CM * 5CM的风扇
1K电阻
杜邦线若干
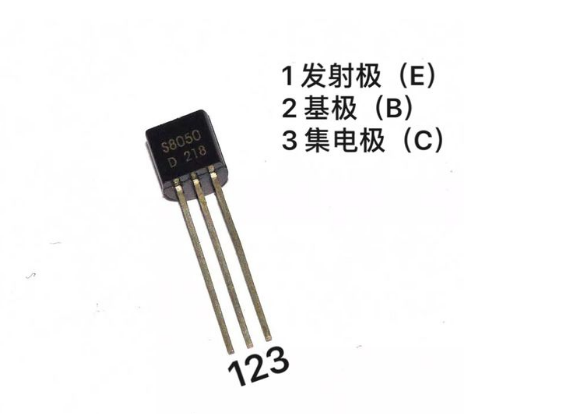
S8050 三极管或其他
二极管(如1N4007)

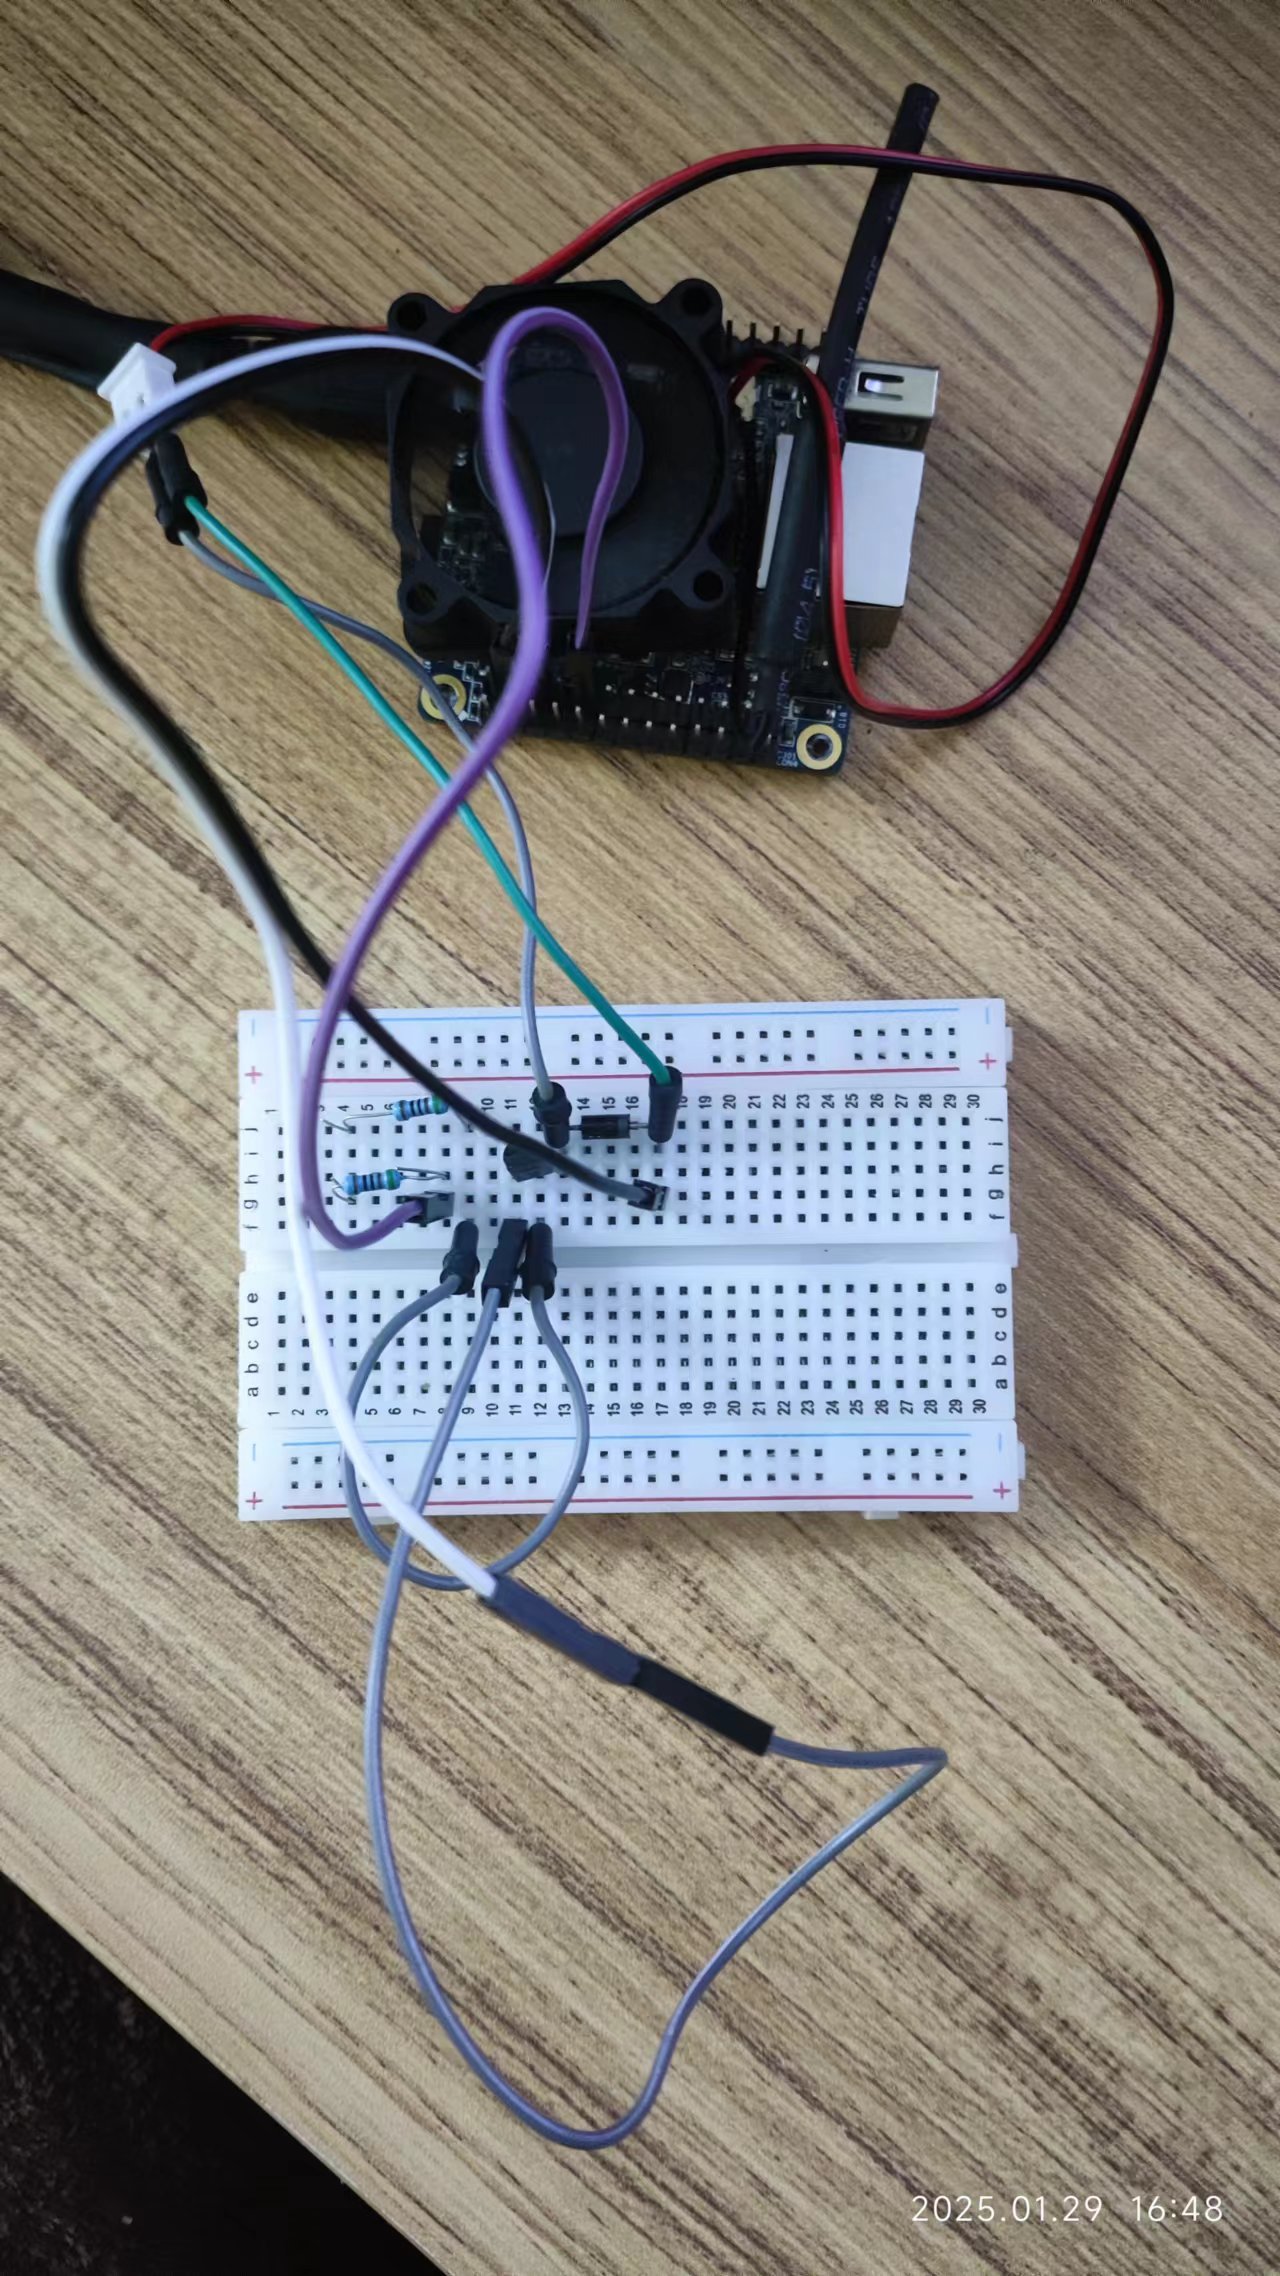
接线示意
这里使用使用wPi=4来进行控制,物理引脚为10
 Orange Pi Zero                   外部电路
+------------------+             +-----------------+
| GPIO (wPi=4)  |----[1kΩ]----| B (晶体管基极)   |
| 5V (引脚4)     |----------------| + (风扇正极)     |
| GND (引脚6)    |----------------| - (风扇负极)     |
+------------------+             | E (晶体管发射极) |
                                 | C (晶体管集电极)--+--> 风扇负极
                                 +-----------------+
                                     二极管反向并联在风扇两端
接线步骤
风扇正极 → 直接连接到 Orange Pi 的 5V 引脚(物理引脚4)。
风扇负极 → 连接到 晶体管集电极(C)。
晶体管发射极(E) → 连接到 Orange Pi 的 GND 引脚(物理引脚6)。
GPIO(wPi=4) → 通过 1kΩ 电阻 连接到 晶体管基极(B)。
二极管 → 反向并联在风扇两端(阴极接风扇正极,阳极接风扇负极)。
示例图
测试
gpio mode 4 out

#测试风扇是否启动
gpio write 4 1
#关闭风扇
gpio write 4 0
脚本
nano /usr/local/bin/fan.sh

#!/bin/bash

# 控制是否输出调试信息到控制台: 1为启用, 0为禁用
DEBUG=1

# 温度阈值(单位℃)
TEMP_THRESHOLD_ON=50    # 开启风扇的温度阈值

FAN_PIN=4  # 假设风扇连接在GPIO引脚4上
gpio mode $FAN_PIN out   #确保引脚为输出状态

COOL_DOWN_PERIOD=120    # 冷却时间(秒),即温度低于阈值后等待2分钟再关闭风扇

debug_echo() {
  # 如果启用了调试模式,则输出传递给函数的信息
  if [ "$DEBUG" -eq 1 ]; then
    echo "$@"
  fi
}

# 初始化冷却计时器为冷却周期
cool_down_timer=$COOL_DOWN_PERIOD

RUNNING=true

fun() {
    while $RUNNING; do
    # 获取CPU温度并转换为摄氏度
    CPU_TEMP=$(cat /sys/class/thermal/thermal_zone0/temp | awk '{print $1/1000}')

    # 使用自定义的debug_echo函数输出当前时间和获取的CPU温度
    debug_echo "$(date '+%Y-%m-%d %H:%M:%S') - 当前CPU温度: ${CPU_TEMP}℃"

    if (( $(echo "$CPU_TEMP > $TEMP_THRESHOLD_ON" | bc -l) )); then
      # 如果温度高于阈值,开启风扇并重置冷却计时器为冷却周期
      gpio write $FAN_PIN 1
      cool_down_timer=$COOL_DOWN_PERIOD  # 重置冷却计时器
      debug_echo "$(date '+%Y-%m-%d %H:%M:%S') - 温度超过阈值($TEMP_THRESHOLD_ON℃),开启风扇."
    else
      # 如果温度低于阈值,检查冷却计时器是否达到设定的时间
      if [ $cool_down_timer -le 0 ]; then
        # 如果冷却计时器已归零或小于等于0,关闭风扇
        gpio write $FAN_PIN 0
        debug_echo "$(date '+%Y-%m-%d %H:%M:%S') - 温度低于阈值($TEMP_THRESHOLD_ON℃),并且冷却计时器已结束,关闭风扇."
      else
        # 如果冷却计时器尚未达到设定时间,继续等待,并递减冷却计时器
        debug_echo "$(date '+%Y-%m-%d %H:%M:%S') - 等待冷却计时器倒计时: ${cool_down_timer}s"
        cool_down_timer=$((cool_down_timer - 30))
      fi
    fi

    # 等待30秒后再次检查
    sleep 30
  done
}

case "$1" in
  start)
    echo "启动风扇..."
    fun
    ;;
  stop)
    echo "关闭风扇..."
    RUNNING=false
    ;;
  *)
    echo "用法: $0 {start|stop}"
    exit 1
    ;;
esac

exit 0
自启动服务
sudo chmod +x /usr/local/bin/fan.sh
sudo nano /etc/systemd/system/fan-control.service
```
[Unit]
Description=Fan Control Service
After=network.target

[Service]
Type=simple
ExecStart=/usr/local/bin/fan.sh start
ExecStop=/usr/local/bin/fan.sh stop
Restart=on-failure
StandardOutput=journal
StandardError=inherit

[Install]
WantedBy=multi-user.target
```

# 重新加载systemd配置
sudo systemctl daemon-reload
# 启用开机自启
sudo systemctl enable fan-control.service
# 立即启动服务
sudo systemctl start fan-control.service
# 查看服务状态
sudo systemctl status fan-control.service
加电开启风扇
说明:以上再进入内核后才会检测风扇开启状态,要在板子加电就开启风扇需要一下设置
方法:
修改DTB文件,对应引脚的定义
修改Uboot源码
再Uboot启动时设置对应引脚为高电平
这里使用方法3,方便一些: 接上TTL, 启动时按空格进入Uboot环境输入以下:
#uboot启动时按空格进入设置uboot env
setenv bootcmd 'gpio set 199; run distro_bootcmd'
saveenv

#重启uboot
reset
LED屏幕显示
参考:https://blog.csdn.net/weixin_43288375/article/details/131148818
准备
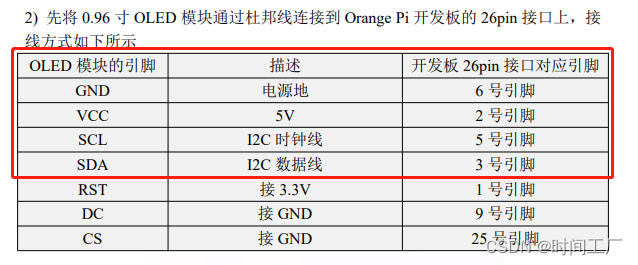
0.96 OLED 1315 显示屏 (5V)
杜邦线若干
前提
阅读《OrangePi_Zero_H2+_用户手册_v3.2.pdf》“3.22.3. I2C ”章节 开启I2C
#挂载boot分区
mount /dev/mmcblk0p1 /mnt

#nano /mnt/armbianEnv.txt 最后添加:
overlays=i2c0 i2c1

#重启板子
reboot
阅读《OrangePi_Zero_H2+_用户手册_v3.2.pdf》“3.23. I2C 接口的 0.96 寸 寸 OLED ”章节,按照说明进行安装必要组件。并测试
apt update
apt install i2c-tools -y
i2cdetect -y 0
#显示一下说明正常:
     0  1  2  3  4  5  6  7  8  9  a  b  c  d  e  f
00:                         -- -- -- -- -- -- -- --
10: -- -- -- -- -- -- -- -- -- -- -- -- -- -- -- --
20: -- -- -- -- -- -- -- -- -- -- -- -- -- -- -- --
30: -- -- -- -- -- -- -- -- -- -- -- -- 3c -- -- --
40: -- -- -- -- -- -- -- -- -- -- -- -- -- -- -- --
50: -- -- -- -- -- -- -- -- -- -- -- -- -- -- -- --
60: -- -- -- -- -- -- -- -- -- -- -- -- -- -- -- --
70: -- -- -- -- -- -- -- --
示意图
安装软件
#全局安装
sudo pip3 install adafruit-circuitpython-ssd1306 --break-system-packages
sudo pip3 install psutil --break-system-packages
sudo pip3 install Pillow --break-system-packages
脚本
说明:脚本来自:https://blog.csdn.net/weixin_43288375/article/details/131148818 新增了亮度控制,默认太亮了
#编写脚本
nano /usr/local/bin/oled.py

import time
import shutil
import subprocess
import psutil
import board
import digitalio
from PIL import Image, ImageDraw, ImageFont
import adafruit_ssd1306
from datetime import datetime

# 定义屏幕尺寸
WIDTH = 128
HEIGHT = 64
BORDER = 5

# 全局资源初始化
i2c = None
oled = None

def cleanup(signum=None, frame=None):
    """清理资源:关闭屏幕并释放 GPIO"""
    global oled, i2c
    if oled:
        oled.fill(0)
        oled.show()
        print("Screen cleared on exit.")
    if i2c:
        i2c.deinit()  # 释放 I2C 总线资源
    sys.exit(0)

def init_display():
    """初始化 OLED 屏幕"""
    global i2c, oled
    try:
        i2c = board.I2C()
        oled = adafruit_ssd1306.SSD1306_I2C(WIDTH, HEIGHT, i2c)
        oled.contrast(10)  # 初始对比度
        oled.fill(0)
        oled.show()
        print("OLED initialized.")
    except Exception as e:
        print(f"Display init failed: {str(e)}")
        cleanup()

# 注册退出信号(Ctrl+C 或 systemd 停止)
signal.signal(signal.SIGINT, cleanup)
signal.signal(signal.SIGTERM, cleanup)

def set_contrast(level):
    """
    设置屏幕对比度(亮度)
    :param level: 对比度级别 (0-255)
    """
    oled.contrast(level)

def get_disk_usage():
    total, used, free = shutil.disk_usage("/")
    disk_space = used / (2**30)  # 转换为GB
    disk_percent = (used / total) * 100  # 计算已用硬盘空间百分比
    return disk_space, disk_percent

def get_memory_usage():
    mem = psutil.virtual_memory()
    memory_usage = mem.used / (2**30)  # 转换为GB
    memory_percent = (mem.used / mem.total) * 100  # 计算已用内存空间百分比
    return memory_usage, memory_percent

def get_cpu_usage():
    # 获取所有核心的平均使用率
    cpu_usage = psutil.cpu_percent(interval=1)

    # 获取每个核心的使用率
    cpu_usage_per_core = psutil.cpu_percent(interval=None, percpu=True)
    cpu_usage_per_core_int = [int(core_usage) for core_usage in cpu_usage_per_core]
    # 格式化核心使用率为 "1% / 2%"
    p_core_usages = "/".join([f"{usage}" for usage in cpu_usage_per_core_int])

    return cpu_usage,p_core_usages

def get_cpu_temperature():
    temperature = subprocess.check_output(["cat", "/sys/class/thermal/thermal_zone0/temp"]).decode("utf-8")
    cpu_temp = float(temperature) / 1000
    return cpu_temp

def get_ip_address():
    ip_address = subprocess.check_output(["hostname", "-I"]).decode("utf-8").split(" ")[0]
    return ip_address

def main_loop():
    """主显示循环"""
    try:
        # 创建图像对象
        image = Image.new("1", (WIDTH, HEIGHT))
        draw = ImageDraw.Draw(image)
        font = ImageFont.load_default()

        while True:
            draw.rectangle((0, 0, WIDTH, HEIGHT), outline=0, fill=0)  # 清空画布

            # 获取系统数据(添加异常处理)
            try:
                disk_space, disk_percent = get_disk_usage()
                memory_usage, memory_percent = get_memory_usage()
                cpu_temperature = get_cpu_temperature()
                ip_address = get_ip_address()
                cpu_usage, p_cpu_usages = get_cpu_usage()
            except Exception as e:
                print(f"Data read error: {str(e)}")
                draw.text((BORDER, 0), "Data Error!", font=font, fill=255)
                oled.image(image)
                oled.show()
                time.sleep(5)
                continue

            # 更新显示内容(优化布局)
            y_pos = 0
            draw.text((BORDER, y_pos), f"Disk: {disk_space:.1f}G ({disk_percent:.1f}%)", font=font, fill=255)
            y_pos += 10
            draw.text((BORDER, y_pos), f"RAM: {memory_usage:.1f}G ({memory_percent:.1f}%)", font=font, fill=255)
            y_pos += 10
            draw.text((BORDER, y_pos), f"CPU: {cpu_usage}% ({p_cpu_usages})", font=font, fill=255)
            y_pos += 10
            draw.text((BORDER, y_pos), f"Temp: {cpu_temperature:.1f}°C", font=font, fill=255)
            y_pos += 10
            draw.text((BORDER, y_pos), f"IP: {ip_address}", font=font, fill=255)

            # 更新屏幕
            oled.image(image)
            oled.show()

            time.sleep(3)  # 可调整刷新间隔

    except Exception as e:
        print(f"Main loop error: {str(e)}")
        cleanup()

if __name__ == "__main__":
    init_display()
    main_loop()
自启动服务
sudo nano /etc/systemd/system/oled-control.service
```
[Unit]
Description=OLED Control Service
After=network.target

[Service]
Type=simple
ExecStart=python3 /usr/local/bin/oled.py
Restart=on-failure
StandardOutput=journal
StandardError=inherit

[Install]
WantedBy=multi-user.target
```

# 重新加载systemd配置
sudo systemctl daemon-reload
# 启用开机自启
sudo systemctl enable oled-control.service
# 立即启动服务
sudo systemctl start oled-control.service
# 查看服务状态
sudo systemctl status oled-control.service
关机
关机时关闭风扇和oled显示屏
nano /etc/systemd/system/poweroff.service

[Unit]
Description=Shutdown OLED Display
DefaultDependencies=no
Before=poweroff.target halt.target
After=sysinit.target

[Service]
Type=oneshot
RemainAfterExit=yes
ExecStop=/usr/local/bin/gpio write 4 0  # 停止风扇
ExecStop=/usr/sbin/i2cset -y 0 0x3C 0x00 0xAE  # 关闭屏幕命令(SSD1306)

[Install]
WantedBy=poweroff.target
完工
评论区